HomeGuidesUber Eats Photo Requirements

Uber Eats Photo Requirements

Pass Uber Eats photo review on the first submission.

  • Exact item and cover sizes, ratios, formats, and file limits
  • Every rejection reason Uber lists, each with a fix
  • How the up-to-3-business-day review clock actually works
  • One shoot you can reuse across Uber Eats and DoorDash
  • A pre-upload checklist that prevents another review cycle

Updated July 2026
Before
After
After
Before
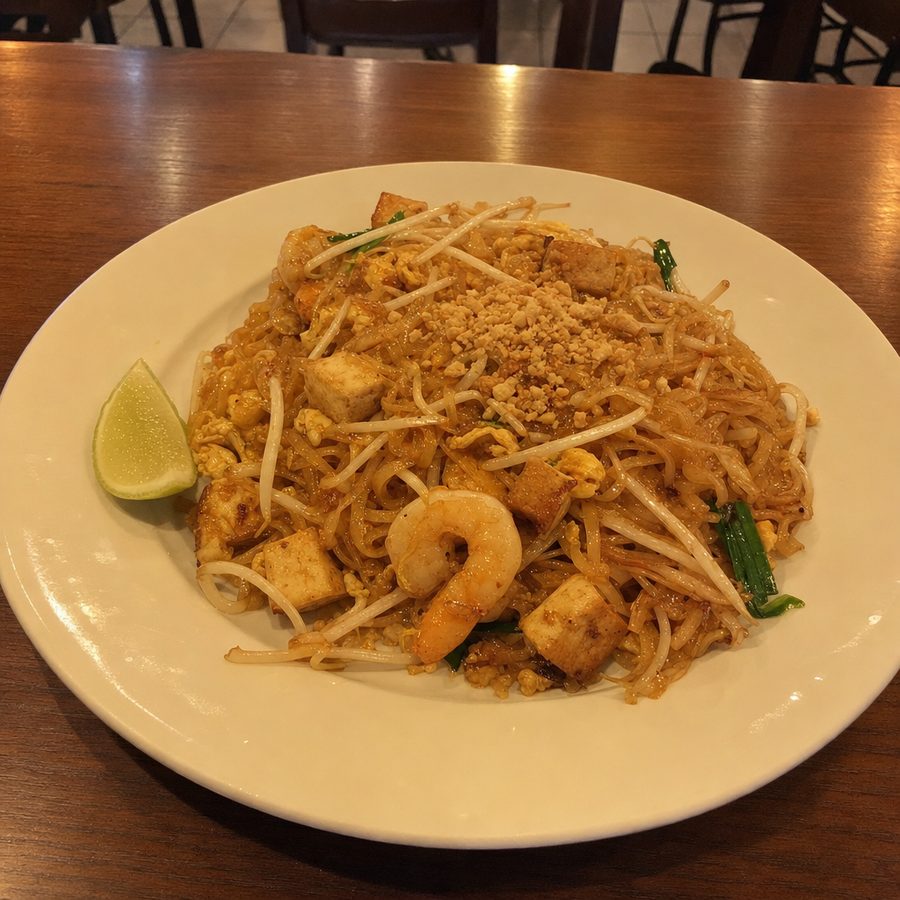
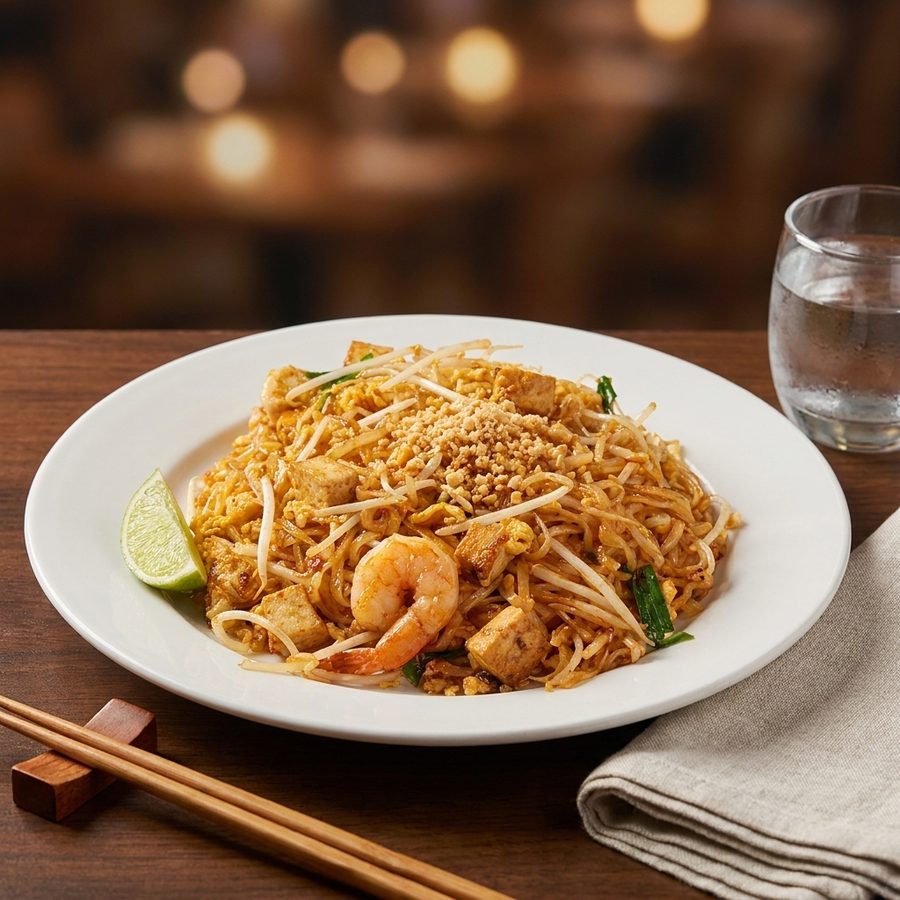
Drag to compare a warm, murky phone photo of pad thai with the color-corrected menu-ready edit of the same plate on a clean restaurant table
On this page

The short version

Item photos: use a 5:4 to 6:4 ratio, a width of at least 550 pixels, JPG, PNG, or GIF format, and a file under 10 MB.

Review reality: manual review takes up to 3 business days. A rejection is expensive because correcting and resubmitting the photo starts that review clock again.

Fastest clean pass: photograph one real menu item, center it with room around the edges, use clear light and sharp focus, remove all added text and logos, and export inside the stated ratio and file limits.

Uber Eats photo specs for 2026

Item and cover images have different technical and content requirements. Check the image type before exporting.

Image typeRequirement
Item aspect ratio5:4 to 6:4 recommended
Item width550 to 10,000 pixels
Item height440 to 10,000 pixels
Item formatsJPG, PNG, or GIF
Item maximum file size10 MB, or 5 MB in Creative Hub in Ads Manager
Cover dimensions2880 x 2304 pixels
Cover ratio and format5:4, JPEG

Specs verified against Uber's Merchant Help Center as of July 2026.

Content matters as much as dimensions

An item photo must accurately show a single item from the menu. Center that item and keep it out of the corners. A cover photo must show products or meals available to buy and must be relevant to the storefront.

Generated or stock imagery is not automatically a named category in this rule. However, an image that does not match the dish your restaurant actually serves conflicts with Uber's accuracy requirement. Photograph the real portion, ingredients, container, and presentation customers will receive.

Why Uber Eats photos get rejected, and how to fix them

Already seeing a rejection? Use the Uber Eats photo rejection checklist to correct the submitted file before the next review.

Blurry or unclear

Uber must be able to see the product clearly. Clean the lens, steady the phone, tap the food to focus, and use enough light for a crisp exposure. The blurry image fix covers capture and export checks.

Dark or uneven lighting

Place the dish near a large window or use soft, diffused light. Avoid a hard overhead source that hides ingredients in shadow. Follow the dark food photo guide before uploading again.

Wrong aspect ratio

Crop the item image between 5:4 and 6:4. Do not stretch the file to force the dimensions. Keep the dish centered and leave enough margin that the crop does not cut through the plate or packaging.

Multiple items in one shot

An item photo must show one item. Photograph each menu listing separately. Do not use a table spread or place a second dish beside the listed product, even if the second item is available separately.

Text, logos, or watermarks

Remove promotional copy, prices, captions, graphic logos, and watermarks from item photos. Export a clean image of the food instead of a social post, flyer, or branded template.

People in the photo

Reframe so no person appears. Hands are allowed in item photos, but faces and bodies should stay outside the image. A simple tabletop composition keeps attention on the listed food.

Restricted item

Do not submit photos of restricted products. Uber lists examples such as smoke-related products, infant formula, and prescription items. Check whether the item itself is eligible before changing the photography.

Inaccurate representation

Replace any generic image with a current photo of the actual menu item. Match the real portion, toppings, sides, and packaging. Accuracy reduces the chance that the image misrepresents what a customer can buy.

Before resubmitting, run through the complete Uber Eats rejection fix once more. A careful check is quicker than waiting through another avoidable review cycle.

What an Uber-ready frame looks like

The useful changes are restrained: a centered single dish, clear detail, balanced light, and enough open space for a 5:4 to 6:4 crop. This pair shows how a source frame can become a cleaner menu image without changing what the dish is.

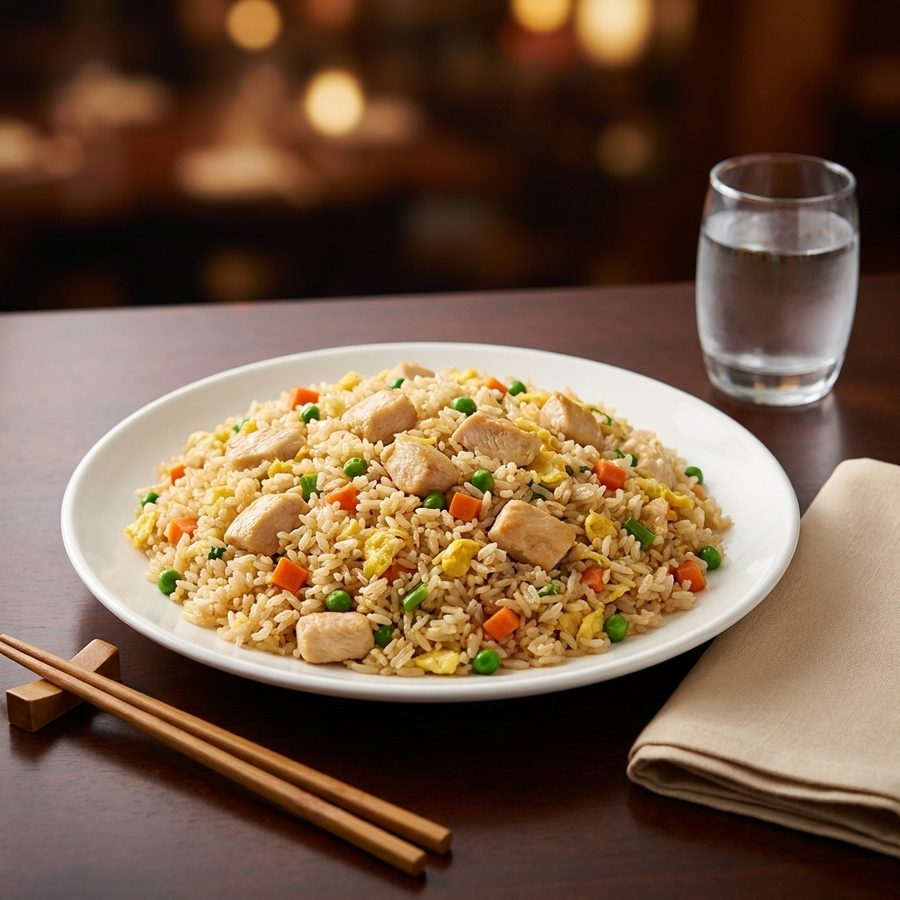
The same restrained approach on a warm, murky photo of chicken fried rice: the light and color are cleaned up and the plate is styled, but the dish itself is not changed.

Before
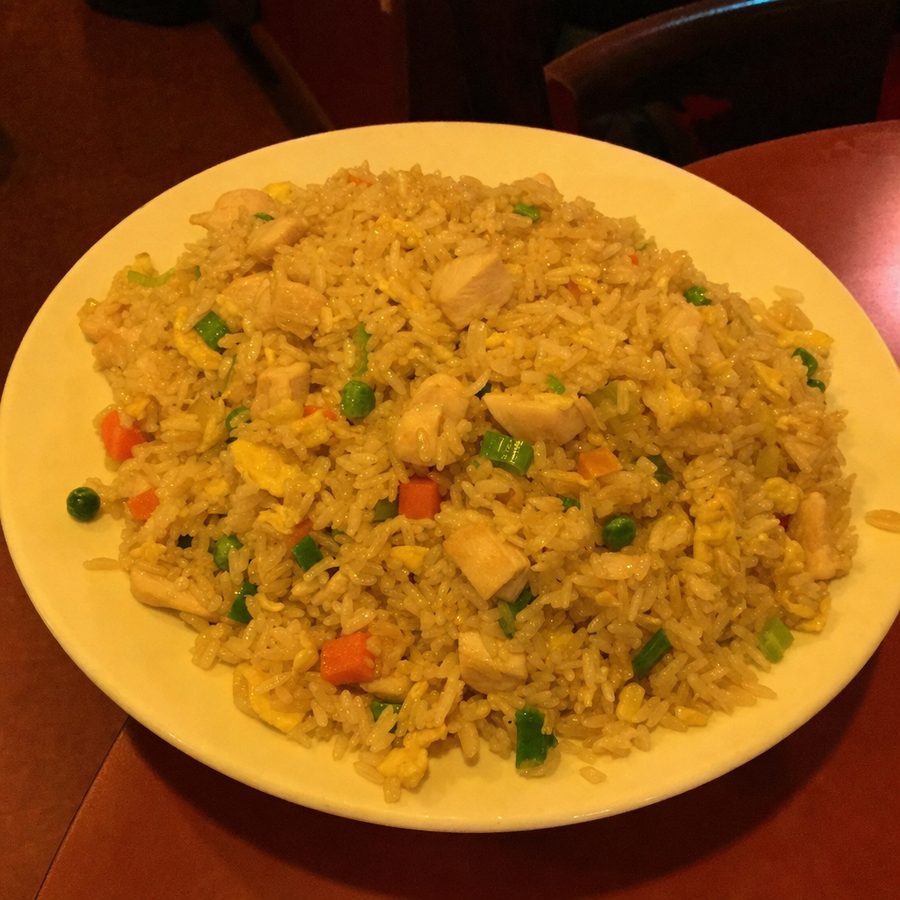
Chicken fried rice photographed under warm, murky restaurant light with a heavy orange cast

After

The same chicken fried rice relit and color-corrected on a clean restaurant table, with the chicken, rice, egg, peas, and carrots unchanged

The 3-business-day review clock

Each submitted photo enters manual review, which can take up to 3 business days. Its status moves from Pending to either Approved or Rejected.

If Uber rejects the image, the item detail page shows a "See Reasons" option, and Uber also sends the reason by email. Correct that reason in Menu Maker and resubmit. The replacement goes through review, so rejection effectively restarts the clock.

Approval does not mean the uploaded pixels remain untouched. Uber may edit the photo's size, orientation, lighting, and color after approval. Compose with margin around the item so modest platform adjustments still leave the food intact.

Uber describes submission, status, reasons, resubmission, and post-approval edits in its menu photo FAQ.

Reuse one shoot across Uber Eats and DoorDash

You do not need a separate photography session for each delivery platform. Capture one high-resolution source set with each dish centered and plenty of background around every edge. A wide, loose composition creates room for platform-specific crops while keeping the real menu item consistent.

Make a 5:4 to 6:4 crop for Uber Eats. Make a separate 16:9 crop for DoorDash. Do not start from an already tight Uber crop when producing the wider DoorDash version because the needed space may no longer exist.

Use the DoorDash photo requirements for that export, then compare the two crops in the delivery platform photo requirements guide. Owners choosing between the marketplaces can also review the full Uber Eats versus DoorDash comparison.

Shoot it during service, use it everywhere

An Uber Eats upload does not need its own project. MenuCapture turns a photo you already take into a listing-ready image, so one plate covers every channel.

  • Shoot the plate during prep or a normal service, right at the pass
  • Upload the phone photo from your phone or your laptop
  • Get a clean, menu-ready image back in about a minute
  • Use the one image on your print menu, Uber Eats, DoorDash, Google Business Profile, and Instagram

Pre-upload checklist for Uber Eats

Technical

  • Set the item photo ratio between 5:4 and 6:4.
  • Use a width of at least 550 pixels and up to 10,000 pixels.
  • Use a height of at least 440 pixels.
  • Export the item photo as JPG, PNG, or GIF and keep it under 10 MB.
  • Check that the food is sharp and well lit.
  • When setting a cover image, prepare a 2880 x 2304 pixel JPEG at a 5:4 ratio.

Content

  • Show one real menu item, centered and out of the corners.
  • Keep any second dish out of the frame.
  • Remove text, logos, and watermarks.
  • Keep faces and bodies out of frame. Hands are allowed.
  • Confirm that the photo does not show a restricted item.

Timing

  • Schedule photo updates before a promotion or launch, not on the day of it. Manual review can take up to 3 business days.
  • Build in a buffer because a rejection restarts the review.
  • Keep the untouched original so a correction does not require a reshoot.

Clearing this list before submitting avoids the reasons Uber lists and the extra review cycles a rejection causes.

Cover and item photo strategy

Treat the cover image as the storefront banner. Uber requires it to show products or meals available to buy and to be relevant to the storefront. Choose a strong, on-brand hero dish that represents what your kitchen is known for, not a logo or an empty room.

Give each menu listing a clear item photo. Item photos sit next to their menu listings, so each image should clearly show that single item. Lead your menu sections with your strongest, most representative dishes because those are the images a browsing customer sees first.

Make the menu feel like one set. Similar lighting, framing, and backgrounds give item photos a consistent presentation instead of making them look mixed from different sources. This consistency is a presentation choice, not a stated Uber rule.

If you are unsure which image a customer sees where, check the current Uber merchant photo guidance.

Three rejections, start to finish

Wrong aspect ratio

  1. Rejected: Uber flags the photo's aspect ratio.
  2. Diagnose: The source was too square or too tall. Confirm the reason against the full Uber Eats rejection checklist.
  3. Fix: Re-crop between 5:4 and 6:4, keeping the dish centered with margin. Edit in MenuCapture or re-crop the original. Reshoot only when there is not enough frame.
  4. Resubmit: Upload the corrected photo in Menu Maker.
  5. Timeline: Allow up to 3 business days for the new review.

Blurry or dark

  1. Rejected: Uber flags the photo's clarity or lighting.
  2. Diagnose: The capture was soft or underexposed. Confirm the reason against the full Uber Eats rejection checklist.
  3. Fix: Correct exposure and sharpness when the detail exists. Otherwise, reshoot near a window with steady hands. Use the dark food photo guide and blurry menu image guide for the specific correction.
  4. Resubmit: Upload the corrected photo in Menu Maker.
  5. Timeline: Allow up to 3 business days for the new review.

Inaccurate or multiple items

  1. Rejected: Uber flags how the photo represents the listing.
  2. Diagnose: The photo showed more than one item or did not match the listing. Confirm the reason against the full Uber Eats rejection checklist.
  3. Fix: Photograph the single listed item as it is served.
  4. Resubmit: Upload the accurate replacement in Menu Maker.
  5. Timeline: Allow up to 3 business days for the new review.

Photographing Uber Eats items by dish type

Uber item photos show one centered dish cropped between 5:4 and 6:4, so a few choices for each category help the food read clearly within that frame.

Burgers and sandwiches

Shoot from a slight downward angle so the bun, fillings, and other layers remain visible instead of collapsing into one flat shape.

Center the single build and leave margin on every side for a clean crop between 5:4 and 6:4. Keep a second sandwich, fries, or another side out of the frame because it could count as more than one item.

Soups, ramen, and rice bowls

Use a higher angle so noodles, rice, vegetables, and broth contents read clearly rather than appearing as a flat surface.

Place a garnish or the included protein on top to create honest color and texture contrast. Center one bowl with open space around it, and keep any second bowl outside the frame.

Salads and bowls

Use soft, even light that keeps greens, grains, proteins, and toppings visually distinct without deep shadows hiding ingredients.

Keep the bowl centered with even margin around it. A slightly raised angle shows depth and the ingredient arrangement without cutting through the rim when the image is cropped.

Drinks

Choose a clean background so the glass, container, and drink color stand out. Light from the side to retain visible condensation and any garnish that comes with the order.

Photograph one hero drink per image. A row, pair, or tasting flight can read as multiple items unless that full grouping is the single menu item being sold.

Desserts

Use a slight angle to capture crumb, glaze, filling, or layers while keeping the dessert recognizable. A clean plate keeps attention on the single item rather than surrounding props.

Leave enough margin around the plate so a 5:4 to 6:4 crop does not clip its edge. If the submission still fails review, check the Uber Eats photo rejection checklist before resubmitting.

Every photo should still show the real, single item a customer will receive.

Frequently asked questions

An item photo should be 550 to 10,000 pixels wide and 440 to 10,000 pixels tall. Uber recommends an aspect ratio from 5:4 to 6:4.

An Uber Eats cover photo should be 2880 x 2304 pixels, which is a 5:4 aspect ratio, and saved as a JPEG. It must show products or meals available from the storefront.

Uber Eats accepts JPG, PNG, or GIF files for item photos. The maximum file size is 10 MB, or 5 MB when using Creative Hub in Ads Manager. Cover photos must be JPEG files.

Manual review can take up to 3 business days. A rejected replacement starts another review, so correcting the stated reason before resubmitting avoids another preventable delay.

Common reasons include blur, an incorrect aspect ratio, multiple items, text, a logo or watermark, a person in the frame, a restricted item, or a photo that does not accurately represent the menu item. Hands are allowed in item photos.

Yes. After approval, Uber may edit the photo size, orientation, lighting, and color before or while displaying it.

The image must accurately represent one real menu item. A stock or generated image that does not match the dish your restaurant actually sells conflicts with that accuracy requirement.

One well-composed source photo can work for both. Shoot wide and leave space around a centered dish, then make a 5:4 to 6:4 crop for Uber Eats and a separate 16:9 crop for DoorDash.

Share this guide

Prepare consistent menu photos for every listing

MenuCapture helps restaurants process menu images at scale, with up to 1,500 edits per month. Plans start at $9/week or $159/year, shown as $13.25/mo billed yearly.

See pricing