Smartphone Menu Photography: Professional Food Photos with Your Phone

Modern smartphones capture high-quality photos. AI processing turns them into professional menu images. No DSLR camera required. No photography experience needed. Take photos with your phone and let AI handle the rest.

  • Dial in the exact iPhone and Android camera settings for food
  • Work around dark kitchens with window light, LED, or AI
  • Match the best angle to each dish type
  • Turn phone photos into menu-ready images in about 30 seconds
Process Your Phone Photos

Works with iPhone, Android, and any smartphone camera

On this page

Why Smartphone Photos Work for Menus

Professional food photography runs $25 to $300 per dish at market rates. Your smartphone plus AI processing costs 2.4 cents per photo on the weekly plan with better convenience and speed. This guide focuses on the phone; the broader menu photography guide covers styling, lighting, and when to hire a pro.

Camera Quality

iPhone 12+ and modern Android phones have 12-48MP cameras with computational photography. Resolution exceeds most menu display requirements.

Immediate Access

Take photos during prep or service. No photographer scheduling. Capture seasonal specials instantly. Update menus same-day. Food-truck owners can pair this workflow with these food truck menu ideas for a clear, compact menu presentation.

A Fraction of the Cost

Professional photographers charge $25-300 per dish at market rates. AI processing costs 2.4 cents per photo. A 10-photo update: 24 cents instead of a $500-2,500 session.

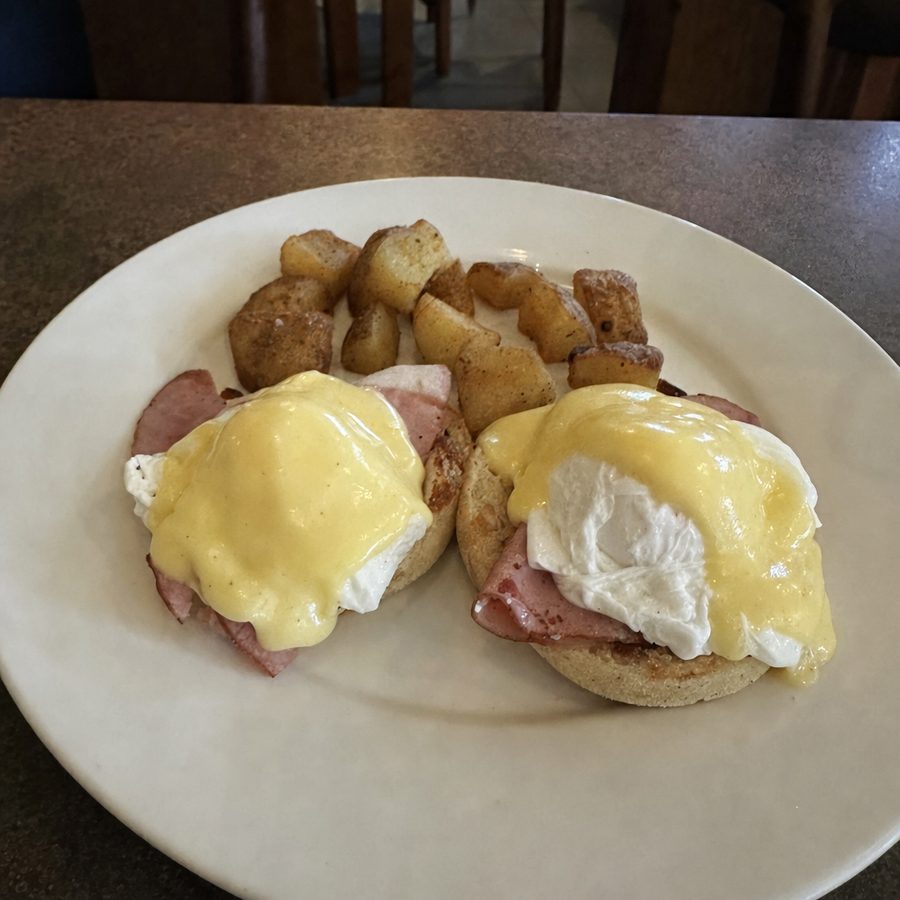
Before

Ordinary flat, dull phone photo of a plate of eggs benedict

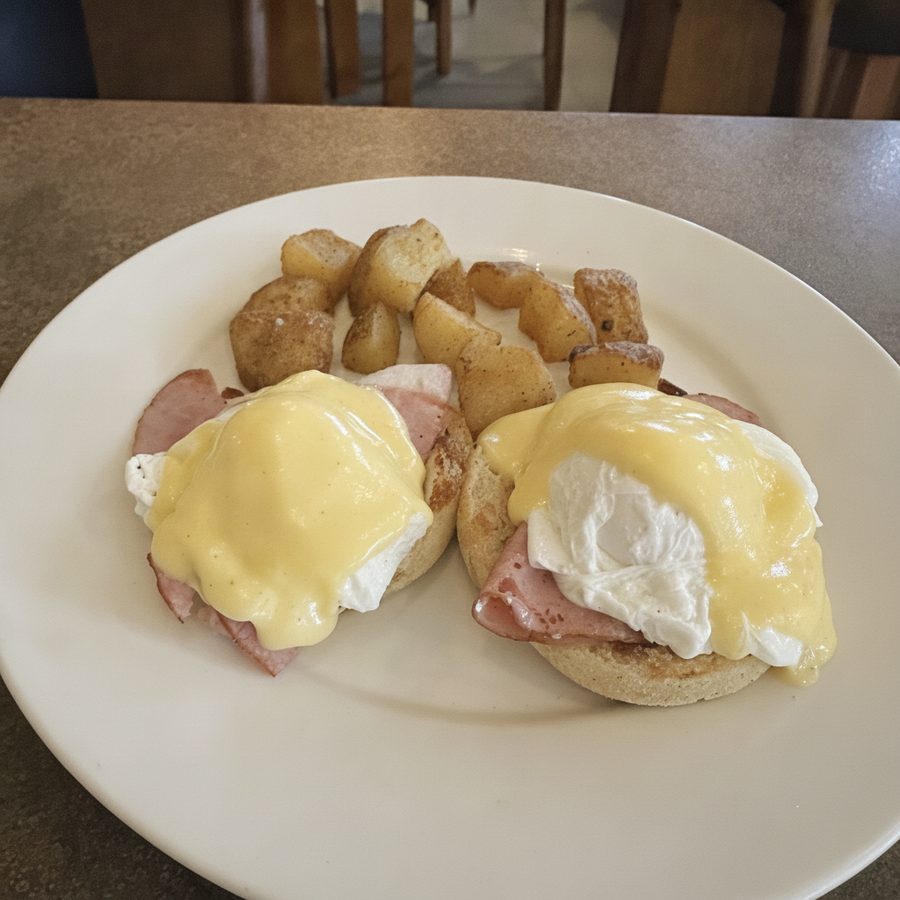
After

The same eggs benedict phone photo corrected to clean, natural, appetizing lighting and color
A phone photo, cleaned up: the same eggs benedict corrected into bright, natural, menu-ready color without changing the dish.

iPhone Food Photography Settings (Step-by-Step)

iPhone 12 and newer have excellent cameras for food photography. Here are the exact settings to use.

iPhone Camera App Settings

Step 1: Set Photo Format

Go to:Settings > Camera > Formats

  • • Select Most Compatible (saves as JPG)
  • • This ensures your photos work on all delivery platforms
  • • Avoid HEIC format, some platforms reject it

Step 2: Enable Grid Lines

Go to:Settings > Camera > Grid

  • • Toggle ON
  • • Use the grid to center dishes and apply rule of thirds
  • • Place the main item at a grid intersection point

Step 3: In the Camera App

When shooting:

  • • Use Photo mode (not ProRAW or Live Photo)
  • • Turn OFF flash (tap the lightning bolt icon)
  • • Tap and hold on the food to lock focus (AE/AF Lock)
  • • Swipe up/down while holding to adjust exposure
  • • Use 1x lens for most dishes (avoid 0.5x wide angle)

Step 4: Portrait Mode (Optional)

For background blur:

  • • Swipe to Portrait mode
  • • Set depth to f/2.8 or f/4.0 (subtle blur is better for food)
  • • Works best at 45-degree angles, not overhead
  • • Skip Portrait mode if you have a clean background already

Watch for fake bokeh artifacts: Portrait mode blurs with software, not glass, and its edge detection struggles with food. Herb sprigs, fork tines, steam, and the far rim of a plate often get smeared into the blur, which reads as a defect at menu size. Zoom in on the edges of the dish before keeping a Portrait shot; if anything looks melted, retake it in normal Photo mode.

iPhone Pro Tips

  • Burst Mode: Hold shutter for multiple shots of steam or motion
  • Timer: Use 3-second timer to avoid camera shake on low light shots
  • Night Mode: Let it activate automatically in dark kitchens, just hold steady
  • Clean your lens: Kitchen grease on the lens is the #1 cause of soft photos

Android Food Photography Settings (Step-by-Step)

Samsung Galaxy, Google Pixel, and other Android phones have excellent food photography features. Here's how to configure them.

Samsung Galaxy

Step 1: Enable Food Mode

In Camera, swipe to MORE > FOOD. This automatically optimizes colors for dishes.

Step 2: Settings

  • • Tap gear icon in Camera
  • • Set Pictures: High quality
  • • Grid lines: ON
  • • Flash: OFF

Step 3: Pro Mode (Advanced)

  • • Use PRO mode for manual control
  • • Set ISO: Auto or 100-400
  • • White Balance: Daylight or Auto

Google Pixel

Step 1: Camera Settings

  • • Open Camera > Settings (gear icon)
  • • Photo resolution: Full
  • • Grid type: 3x3
  • • Flash: OFF

Step 2: When Shooting

  • • Tap to focus on the main dish
  • • Use exposure slider if too dark/bright
  • • Night Sight activates automatically

Step 3: Portrait Mode (Optional)

  • • Software blur can smear food edges
  • • Check garnish and plate rims before keeping
  • • Avoid for overhead shots

General Android Tips

  • File format: Most Android phones save as JPG by default (good for delivery platforms)
  • Auto HDR: Keep enabled, it helps with high contrast kitchen lighting
  • Voice commands:Say "Cheese" or "Capture" for hands-free shots
  • Timer: Use 3-second timer to reduce camera shake
  • Scene optimizer: Disable if colors look oversaturated
  • Lens cleaning: Wipe lens with microfiber cloth before shooting

Dark Kitchen Photography: Getting Good Photos Without Natural Light

Most restaurant kitchens have terrible lighting for photos. Here's how to work around it.

The Problem with Restaurant Lighting

  • • Overhead fluorescent lights create harsh shadows under food
  • • Warm incandescent/tungsten lights make everything look yellow or orange
  • • Mixed lighting (warm + cool) confuses your phone's white balance
  • • Low light = phone compensates with slow shutter = blurry photos

Solution 1: Find Natural Light

Natural light is always best. Look for:

  • Windows: Set up a table near any window, even a small one
  • Back door: Kitchen exits often have natural light
  • Dining room: Shoot during off-hours in the dining area near windows
  • Outside: Take dishes outside briefly for photos (best option)

Best time: 10am-2pm for soft, even daylight

Solution 2: Portable LED Light ($20-50)

A small LED panel solves most dark kitchen problems:

  • Set to 5500K-6000K (daylight color temperature)
  • Position at 45 degrees from the front-left or front-right
  • Diffuse with parchment paper if light is too harsh
  • Turn off overhead lights when using LED to avoid mixed lighting

Recommended: Neewer 176 LED ($25) or similar

Solution 3: Shoot in Bad Light, Fix with AI

If you can't find natural light or add LED lighting, shoot under restaurant lights and let AI fix it:

Yellow Cast (Warm Lights)

Common under tungsten bulbs

"fix yellow color cast, make lighting neutral"

Dark/Underexposed

Common in dim kitchens

"brighten photo, add natural lighting effect"

Harsh Shadows

Common under overhead lights

"soften shadows, even out lighting"

5-Minute Dark Kitchen Photo Setup

1

Find a spot near any window or door

2

Turn off overhead lights if using natural light

3

Place dish at 45° angle to light source

4

Clean phone lens with cloth

5

Take 3-5 shots from different angles

Lighting Fundamentals for Any Phone

Whether you use iPhone or Android, these lighting principles apply to all smartphone food photography.

Lighting Do's

  • Side/back lighting: Light from the side or behind creates depth and texture
  • Soft, diffused light: Avoid harsh direct sunlight; clouds are your friend
  • Consistent color temperature: All lights same type (all daylight or all tungsten)
  • White bounce card: A white plate or napkin reflects light back into shadows

Lighting Don'ts

  • Phone flash: Creates flat lighting and harsh shadows behind food
  • Direct overhead lights: Creates dark shadows under food and on plate
  • Mixed lighting: Daylight + tungsten = impossible white balance
  • Front lighting: Light from camera direction = flat, unappetizing photos

From Capture to Upload: Tripod, Editing Apps, Export Sizes

Three small additions close the gap between a decent phone photo and one that is ready for a delivery platform.

A $15-25 Phone Tripod

The cheapest upgrade with the biggest effect on sharpness. Dim dining rooms force slow shutter speeds, and handheld shots blur at exactly the moment the light gets moody.

  • Pair it with the 3-second timer so pressing the shutter cannot shake the frame
  • Lock in one position and every dish gets the identical angle, which makes a menu look consistent
  • Any small tabletop tripod with a phone clamp works; flexible-leg models wrap onto shelves

Editing Apps Worth Installing

Edit in this order: exposure first, then white balance, then a light touch of contrast. Leave saturation nearly alone.

  • Built-in editor: the iPhone Photos and Google Photos adjusters cover exposure and warmth for free
  • Snapseed (free): selective adjustments let you brighten just the dish
  • Lightroom Mobile (free tier): copy one dish's edit across the whole batch
  • MenuCapture: type the change instead of finding the slider, useful for background swaps and lighting fixes sliders cannot do

Platform-Ready Export Sizes

Shoot at full resolution, then crop each export from the original. These are the current verified targets; DoorDash and Uber Eats numbers come from their merchant help docs, the Grubhub figure mirrors its developer portal specifications.

PlatformSizeRatioFormatMax file size
DoorDash1400x800 px minimum16:9 landscape onlyJPG, JPEG, PNG2MB stated, up to 16MB accepted
Uber Eats550x440 px minimum5:4 to 6:4 recommendedJPG, PNG, GIF10MB
Grubhub1400x1400 px target1:1 squareJPEGNot published

Keep the dish centered and one landscape original covers all three crops. The full rules live in the DoorDash photo requirements, the Uber Eats photography guide, and the six-platform comparison. Before uploading, verify each file with the free Platform Checker.

Best Angles for Different Food Types

Each dish type photographs best from specific angles. Capture 3-5 shots per dish for options.

Overhead (90 degrees)

Best for flat dishes where you want to show all components at once.

  • • Pizza (shows all toppings)
  • • Salads (shows ingredients)
  • • Sushi platters
  • • Grain bowls

45-Degree Angle

Most versatile angle. Shows depth and height while capturing toppings.

  • • Burgers (shows layers)
  • • Pasta (shows sauce coating)
  • • Plated entrees
  • • Most desserts

Eye-Level (Straight On)

Emphasizes height and layers. Creates appetite appeal.

  • • Tall burgers
  • • Layer cakes
  • • Stacked sandwiches
  • • Cocktails and beverages

Pro Tip: Take multiple angles of each dish. AI processing lets you try different edits on each angle to find the best final image.

How AI Transforms Smartphone Photos

AI processing corrects common smartphone photo issues and adds professional food styling. Type what you want changed.

Lighting Correction

Restaurant lighting creates yellow casts and dark shadows. AI analyzes and corrects.

Text prompts that work:

"brighten lighting and make colors more natural"

"remove yellow cast from overhead lighting"

Food Styling Enhancement

Add the finishing touches that professional food stylists apply. AI understands food presentation.

Text prompts that work:

"add steam rising from the dish"

"make sauce more glossy and appetizing"

"add fresh herb garnish"

Background Changes

Replace cluttered restaurant backgrounds with clean, professional surfaces.

Text prompts that work:

"place on clean marble surface with soft lighting"

"rustic wooden table background"

"concrete industrial surface"

Smartphone to Menu: The Complete Workflow

1

Take Photos During Prep

Capture dishes near a window with natural light. Use the settings above. Take 3-5 shots per dish from different angles.

2

Upload to MenuCapture

Drag and drop photos or upload from your phone. Process up to 10 at once.

3

Type What You Want Changed

"Brighten lighting, make sauce glossier, add steam." AI processes in 30 seconds.

4

Edit Again if Needed

Not perfect? Edit the edited image. Add more changes. Complete version history saved.

5

Download and Use

Download individual images or bulk ZIP. Use on your website, menu, and ordering platforms.

Smartphone + AI vs. Professional Photography

The real cost comparison for restaurant menu photography.

Professional Photographer

  • •$25-300 per dish at market rates
  • •2-3 weeks to schedule
  • •2-7 days for delivery
  • •Must photograph during service
  • •Re-shoots cost extra

10-photo menu: typically a $500-2,500 session

Smartphone + MenuCapture

  • 2.4 cents per photo
  • Take photos anytime
  • 30-second processing
  • Capture during prep (best lighting)
  • Up to 1,500 edits/month included

10-photo menu: 24 cents

A phone photo plus AI processing costs a small fraction of a professional session, with results in seconds instead of weeks.

Frequently asked questions

Yes. Modern smartphones like iPhone 12+ and recent Android phones have 12-48MP cameras with computational photography that exceeds most menu display requirements. AI processing corrects common smartphone limitations like poor lighting and color accuracy, delivering professional results in 30 seconds.

Turn off flash (creates harsh shadows), enable grid lines for composition, and tap to focus on the food. Standard Photo mode is the safer default; Portrait mode's software blur can smear food edges, so inspect the dish edges before keeping a Portrait shot. Natural lighting near a window produces the best raw images for AI processing.

AI analyzes your smartphone photos and corrects lighting, color balance, and food presentation issues. Type instructions like "brighten lighting," "make sauce glossier," or "add fresh garnish" and AI applies professional food styling techniques in 30 seconds.

No photography experience needed. Follow the camera settings and lighting tips on this page to capture good raw photos. AI handles the professional styling and corrections. Type what you want changed and AI applies it.

Use JPG (Most Compatible mode). Go to Settings > Camera > Formats and select "Most Compatible." HEIC files are smaller but some delivery platforms like Uber Eats and DoorDash may reject them or have issues displaying them. JPG works everywhere.

Three options: (1) Set up near any door that leads outside and shoot during daylight. (2) Buy a portable LED panel ($20-50) set to 5500K daylight color temperature. (3) Shoot under your existing lights and use AI to fix the yellow color cast and dark shadows afterward.

Both work well. iPhones have consistent quality across models. Samsung Galaxy phones have a dedicated Food mode that optimizes colors automatically. Google Pixel phones excel in low light with Night Sight. The bigger factor is lighting and composition, not the phone itself.

Use it selectively. Portrait mode creates background blur in software, and its edge detection often smears fine food details like herb garnishes, fork tines, steam, and plate rims. Zoom in on the edges of the dish before keeping a Portrait shot. For overhead shots and dishes with delicate garnish, standard Photo mode is safer.

Shoot at full resolution and crop per platform. DoorDash requires at least 1400x800 pixels in 16:9 landscape (JPG, JPEG, or PNG). Uber Eats accepts 550x440 pixels and up, with a 5:4 to 6:4 ratio recommended and a 10MB cap. Grubhub lists a square 1400x1400 pixel JPEG target. Modern phone cameras exceed all of these, so the crop matters more than the megapixels.

Share this guide

Turn Your Phone Photos into Menu-Ready Images

Upload smartphone photos, type what you want changed, get professional results in 30 seconds.

Process Your Phone Photos