Why Your Food Photos Look Yellow
(And How to Fix It)
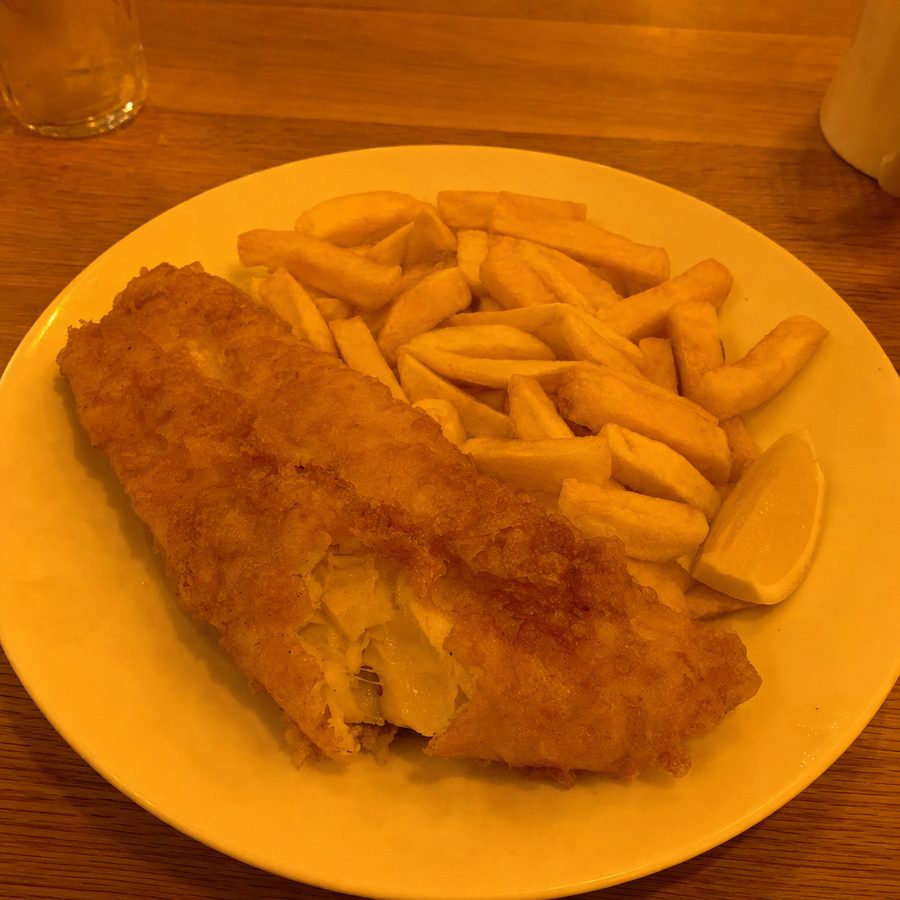
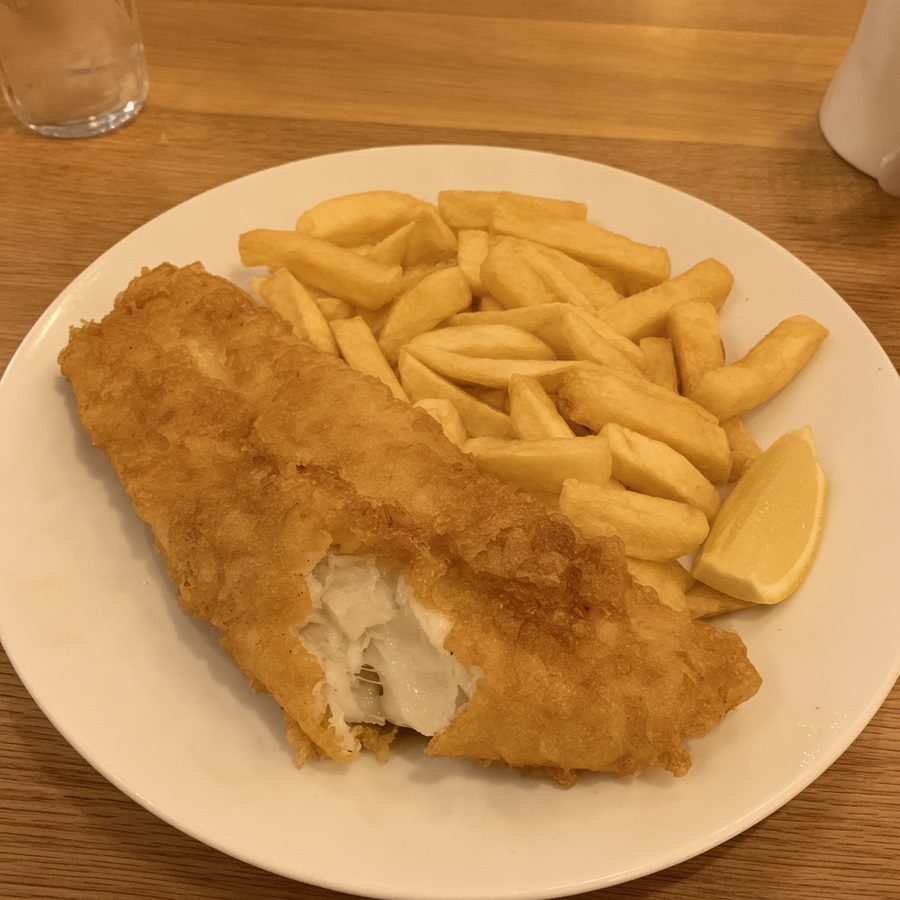
Your food looks delicious in person, but the photo has an orange or yellow tint that makes it look unappealing. Your restaurant's warm lighting is the cause. Here's how to fix it.
- See why warm restaurant bulbs turn dishes yellow
- Read the color temperature chart from warm bulbs to daylight
- Set white balance on iPhone or Android and lock it for a whole menu
- Correct a color cast without draining the food's natural warmth
On this page
Why Your Food Photos Have a Yellow/Orange Tint
The science: Human eyes adapt to different light colors automatically. We see a white plate as white whether it's in sunlight or under warm bulbs. Cameras don't have this ability. They capture the actual color of the light hitting the sensor.
Before
After
Understanding Color Temperature
Light color is measured in Kelvin (K). Lower numbers = warmer/yellower. Higher numbers = cooler/bluer.
| Temperature | Name | Effect on Photos | Where You Find It |
|---|---|---|---|
| 2700K | Soft/Warm White | Orange/yellow cast | Most restaurant bulbs |
| 3000K | Warm White | Noticeable yellow | Some restaurants |
| 4000K | Neutral White | Slight warm tint | Office spaces |
| 5000K | Daylight | Natural colors | Photography ideal |
| 6500K | Cool Daylight | Slight blue tint | Overcast sky |
Takeaway: Most restaurants use 2700-3000K lighting. For accurate colors, you need to either shoot in 5000K light or correct the color after.
DIY Fixes (Try These First)
Before reaching for AI tools, try these white balance fixes. They cost nothing and can make a significant difference.
How to Set White Balance on Your Phone
One more trick worth knowing: white balance lock. On most phones, once you've set white balance manually (or long-pressed to lock exposure and focus), the setting holds between shots. That matters when you're photographing a whole menu, because auto white balance re-guesses on every single frame. One dish comes out neutral, the next slightly orange, the next slightly green, and your menu looks patchy. Lock the setting once at your photo spot, then shoot everything in the same session. The full phone-camera workflow is in our smartphone menu photography guide.
The Mixed Lighting Trap
The hardest yellow-cast photos to fix are the ones shot under two different light sources at once. Picture a table near a window in a warmly lit dining room: daylight hits one side of the plate at around 5500K, tungsten bulbs hit the other at 2700K. No single white balance setting can be right for both. Correct for the window and the bulb side goes orange. Correct for the bulbs and the window side goes blue.
Cameras can't split the difference well, and neither can a global temperature slider in editing. The practical fix is to remove one of the sources before you shoot. Either move the plate fully into the window light and switch off or block the nearby bulbs, or move away from the window and let the warm light dominate, then correct the single, uniform cast afterward. One consistent color of light, even the wrong color, always beats two competing ones.
Watch for sneakier mixes too: a heat lamp over the pass, a neon sign behind the counter, or a TV screen near the table all stamp their own color onto part of the frame. If one side of your dish keeps coming out a different color than the other, hunt for the second light source before blaming your camera.
Fixing a Color Cast in Editing
Already took the photo? A uniform yellow cast is one of the most fixable problems in food photography, if you adjust the right control. Reach for the Temperature (sometimes labeled Warmth) slider, not the saturation slider. Removing color with saturation drains the food along with the cast and leaves everything gray.
- Find a reference white. A plate, napkin, or rice. Slide temperature toward blue until that reference looks white rather than cream.
- Check the tint axis too. If the photo looks slightly green after cooling it (common under fluorescents and cheap LEDs), nudge the Tint slider toward magenta.
- Stop before it goes cold. A finished food photo should keep a hint of warmth. If the plate looks blue-white and the food looks clinical, back off.
- Match the whole menu. Apply the same correction to every photo from the session so dishes don't clash on your listing page.
This judgment call, warm enough to be appetizing but neutral enough to be accurate, is exactly what MenuCapture's AI is trained on. It reads what's on the plate and corrects the cast without pushing the food cold, then applies the same treatment across your whole menu. If your photo is dark as well as yellow (they usually travel together, both come from the same dim warm bulbs), the dark food photos guide covers the brightness half of the fix.
AI Fix: Perfect Colors in 30 Seconds
White balance settings work, but they require manual adjustment every time. AI color correction is smarter. It understands what food should look like and corrects accordingly.
Why AI works better than manual editing:
- Understands how different foods should look
- Preserves appetizing warm tones where appropriate
- Corrects color without making food look cold/clinical
- Handles mixed lighting situations (warm + cool)
- Consistent results across all your menu photos
Color Correction Mistakes to Avoid
Frequently asked questions
Your brain has "chromatic adaptation," which automatically adjusts your perception so whites look white regardless of the light color. Cameras don't have this ability. They capture the actual color temperature of the light hitting the sensor.
Not if done properly. Good color correction removes the excess yellow cast while preserving the natural warm tones that make food look appetizing. AI tools are trained specifically on food photos to understand this balance.
No. Your ambient lighting is designed for customer experience, not photography. Instead, set up a dedicated "photo station" with a daylight-balanced light source, or use AI correction to fix the color cast after shooting.
Recent flagship phones (iPhone Pro models, Google Pixel, Samsung Galaxy S series) have noticeably better auto white balance than budget phones, and computational photography helps them neutralize warm casts automatically. But no phone fully solves 2700K dining-room lighting on auto. Whatever you shoot with, a manual white balance setting or a correction pass afterward beats upgrading hardware. Technique matters more than the phone.
Look at something that should be white in the photo: a plate, napkin, or rice. If it looks yellow or orange, you have a color cast. You can also use our free Platform Checker tool to analyze your photo's quality.
Keep reading
Fix Blurry Menu Photos
Why menu photos come out blurry and how to sharpen them.
Fix Dark Food Photos
Brighten underexposed dish photos without washing out the food.
Smartphone Menu Photography
Shoot menu-ready dish photos with a phone you already own.
Food Photography for Restaurants
The craft hub: lighting, styling, and shooting dishes for your menu.
Stop Yellow Photos from Hurting Your Sales
Customers expect to see natural, appetizing food colors. Yellow-tinted photos make your dishes look less fresh. Upload your photo to MenuCapture and get back accurate, appetizing colors.
Fix Your Yellow Photo